Disclaimer: This post may contain affiliate links. Please read my Disclosure for more info.
It’s never too late! That’s my motto.
I was procrastinating for years before finally starting my food blog. Always thinking about it but never getting down to actually doing it. Quite frankly I wish I had started sooner! It’s been such an incredible learning experience (I’m still learning LOL) and have enjoyed every bit of it.
Having your own little blog on the internet is really rewarding.
But how do you start and where?
Who’s going to find me and my blog on the internet and how?
I had the very same questions and it can feel a little daunting and overwhelming which is why I decided to give you a small guide on how to start a food blog in 4 easy steps.
In any new project, one of the hardest things to do is actually just getting started.
So if you love cooking and if you’ve thought about starting your own food blog, don’t wait, just get to it!
STARTING A FOOD BLOG IS EASIER THAN YOU THINK!
So let’s get you started. Put everything on hold for the next 30 minutes and follow the steps below. You’ll be a proud owner of your very own food blog before you know it!
HOW TO START A FOOD BLOG
STEP 1: What’s your niche?
Decide what you want to blog about. Sure, you know it’s going to be a food blog but finding your niche is important because it will help you stand out from the crowd.
There are so many niches out there so choose what enthuses you the most and above all, what you’ll enjoy talking about and actually cooking!
In my particular case, because I’m wheat and dairy intolerant, I decided to teach people how easy it is to cook their favourite foods with a food intolerance. I struggled with this in the beginning so I wanted to teach people what I had learnt along the way.
However, for you it might be baking delectable cakes, or you love vegan recipes, or you know all there is to know about keto recipes, you love preparing breakfast recipes, the list is endless.
So take time to decide what your niche will be as this will certainly help you create a successful blog and help you build your audience.
STEP 2: Choose a domain name and hosting plan
A domain name is the name and address of your food blog, like mine is yummyalternatives.com.
Choose something that inspires you but try to keep it short and catchy if possible. You want a name people will easily remember and one that sticks in their mind.
Once you’ve come up with a couple of names, head over to Bluehost and check if it’s available and don’t forget to place .com after your chosen name.

Bluehost is one of the most reliable and affordable hosting providers around and I’ve been using them on my blog. Another bonus is that they offer FREE domain name registration! Not all hosting companies offer it. I’m absolutely not tech-savvy at all, but Bluehost is the easiest and cheapest option for a new food blogger in my opinion.
Now perhaps your wondering, what on earth is a hosting provider. Good question!
Basically a hosting service provider is where your site will be stored, on a server, so that your blog can be viewed by the internet.
As I mentioned, I personally use Bluehost and I’m very happy with them and can highly recommend them. They have a 24 hour chat service which is important and extremely helpful, should you run into any issues or require assistance.
So let’s continue, shall we. Click on ‘Get Started’.
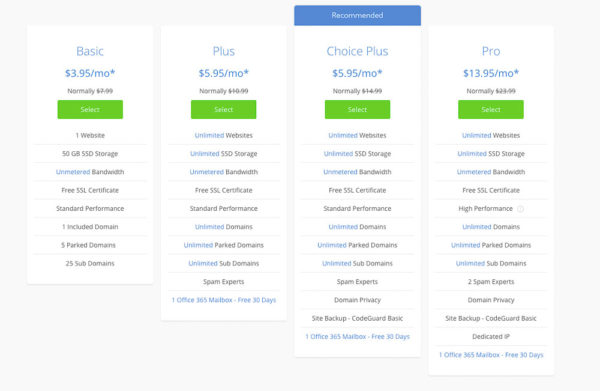
You’ll now be directed to a page with different Hosting Plans. So choose a plan.
I suggest that you commence with the Basic Plan, which is only $3.95 per month through my link, you’ll end up saving quite a bit of money and it’s probably all you’ll need to begin with. You can always upgrade if you need to later on.
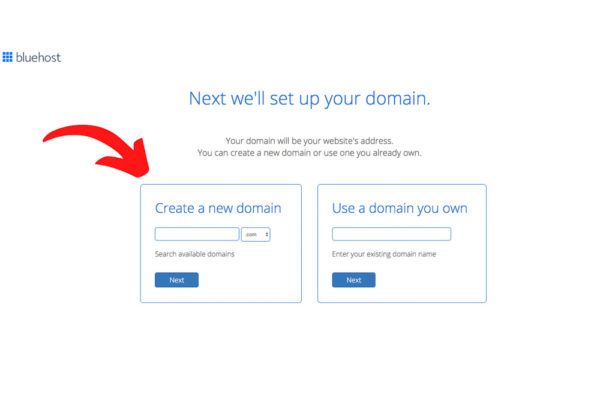
Click ‘Select’. Now you’ll be asked to register your domain name:
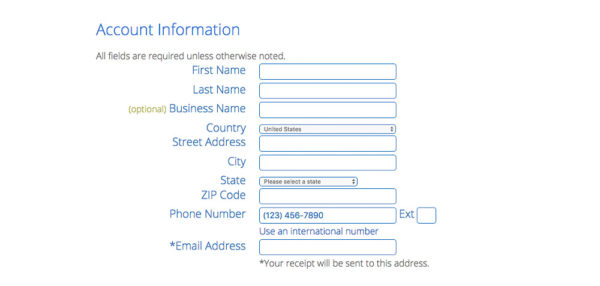
Click ‘next’ and fill out the required fields in the next window regarding your account and payment information:
Next you’ll be asked to pick the package information.
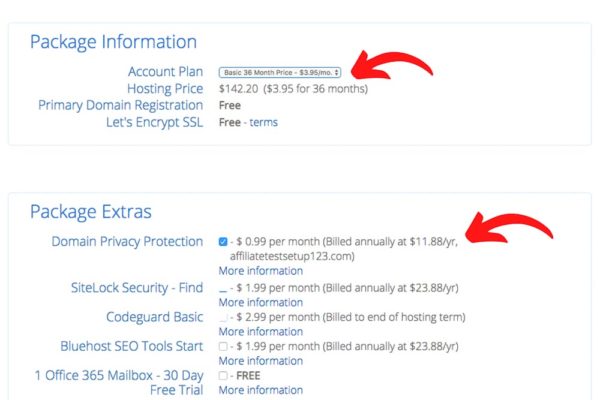
I personally suggest and recommend that you select ‘Domain Privacy Protection’. This option will hide your phone number and address from being displayed to the public. It’s what I use.
I know there are other blogging sites to choose from like Blogger or Tumblr which may be free but if you want to make money from your food blog down the track then buying your own domain and hosting plan is the best step to take right from the word go.
I researched this a lot, when I first started on my journey and I know it’s not easy if you’re on a tight budget, but the free sites can be restrictive if you want to grow your blog and customise it.
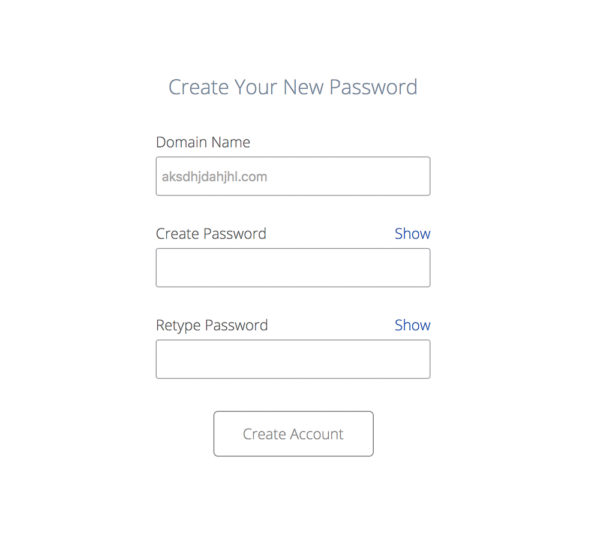
You’ll now be requested to create a password to your domain. Confirm.
CONGRATULATIONS! YOU SUCCESSFULLY FINISHED THE FIRST 2 STEPS AND SET UP YOUR OWN DOMAIN AND HOSTING PLAN. YOUR WELL ON YOUR WAY TO STARTING YOUR VERY OWN FOOD BLOG!
Now you’re ready to install WordPress!
STEP 3: INSTALLING WORDPRESS
WordPress is the n°1 blogging platform used by most popular bloggers and it’s FREE. It’s very easy to use and install especially through Bluehost. It’s the software I use on my blog, yummyalternatives.com.
WordPress.org OR WordPress.com: there is a difference!
WordPress.org allows you to have a self-hosted blog which means you’ll have full control and freedom on designing your blog. With WordPress.org YOU own your website and all its data. It will allow you to install third party advertising as well as creating an online store. Therefore, if you want to build a business with your blog, further down the track, you’ll be able to do it with WordPress.org.
WordPress.com is a hosting service and a platform for hobby bloggers and if you just want a family blog. Their free plan has very limited functions and the other four plans are paid plans. You’re not allowed to place ads on your website therefore limiting your monetisation.
Follow the prompts and fill in the information requested to start creating your food blog website.
Congratulations! you have just officially logged into your blog and successfully finished Step 3 Installing WordPress! Give yourself a big pat on the back!
Bluehost have made it even easier as they automatically install WordPress for you when you follow the prompts. How good is that!
STEP 4: MAKE YOUR FOOD BLOG LOOK FANTASTIC
You now officially own your own food blog! How do you feel? A little nervous?
You’ll soon be able to start sharing all your wonderful recipes to the rest of the world and I for one will be looking forward to it.
To make your blog look fantastic you need to pick a theme. WordPress offers a lot of free themes that you can choose from. You can check them out here
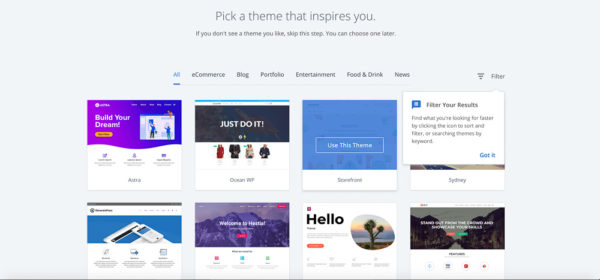
However, if you would like a premium theme, many bloggers use:
The Thesis Theme
The Genesis Framework
Elegant Themes
Divi
I personally chose Sprout & Spoon from the Forest Themes. I didn’t find what I was looking for with the free themes offered in WordPress and I searched for a theme that was easy to use, affordable and adaptable to food blogging.
IN SHORT
Choose your niche area in food blogging.
Choose a domain name and join Bluehost to store your site data.
Install WordPress
Make your blog look fantastic.
Congratulations you have your very own food blog! Now you can start cooking and posting to your hearts content!